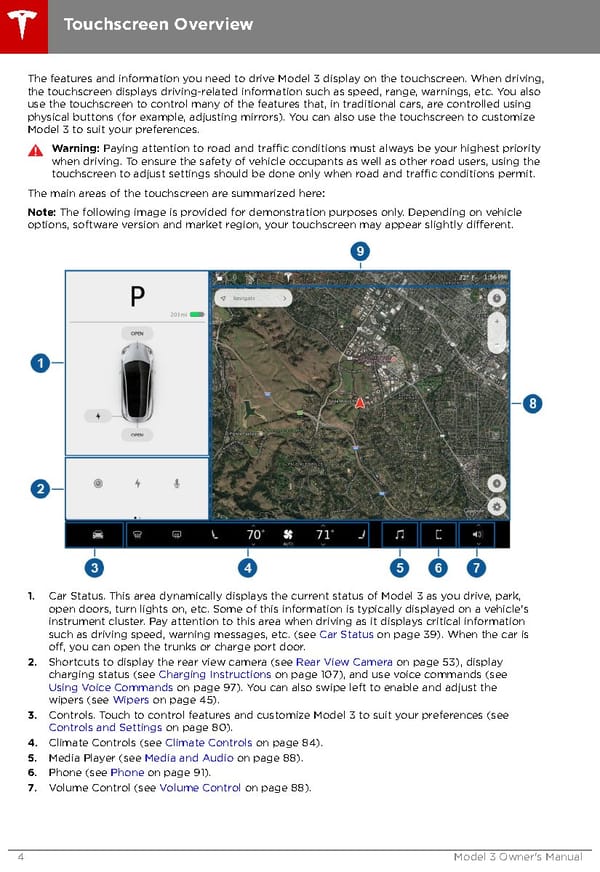
Touchscreen Overview The features and information you need to drive Model 3 display on the touchscreen. When driving, the touchscreen displays driving-related information such as speed, range, warnings, etc. You also use the touchscreen to control many of the features that, in traditional cars, are controlled using physical buttons (for example, adjusting mirrors). You can also use the touchscreen to customize Model 3 to suit your preferences. Warning: Paying attention to road and traffic conditions must always be your highest priority when driving. To ensure the safety of vehicle occupants as well as other road users, using the touchscreen to adjust settings should be done only when road and traffic conditions permit. The main areas of the touchscreen are summarized here: Note: The following image is provided for demonstration purposes only. Depending on vehicle options, software version and market region, your touchscreen may appear slightly different. 1. Car Status. This area dynamically displays the current status of Model 3 as you drive, park, open doors, turn lights on, etc. Some of this information is typically displayed on a vehicle's instrument cluster. Pay attention to this area when driving as it displays critical information such as driving speed, warning messages, etc. (see Car Status on page 39). When the car is off, you can open the trunks or charge port door. 2. Shortcuts to display the rear view camera (see Rear View Camera on page 53), display charging status (see Charging Instructions on page 107), and use voice commands (see Using Voice Commands on page 97). You can also swipe left to enable and adjust the wipers (see Wipers on page 45). 3. Controls. Touch to control features and customize Model 3 to suit your preferences (see Controls and Settings on page 80). 4. Climate Controls (see Climate Controls on page 84). 5. Media Player (see Media and Audio on page 88). 6. Phone (see Phone on page 91). 7. Volume Control (see Volume Control on page 88). 4 Model 3 Owner's Manual
 Tesla Model 3 | Owner's Manual Page 3 Page 5