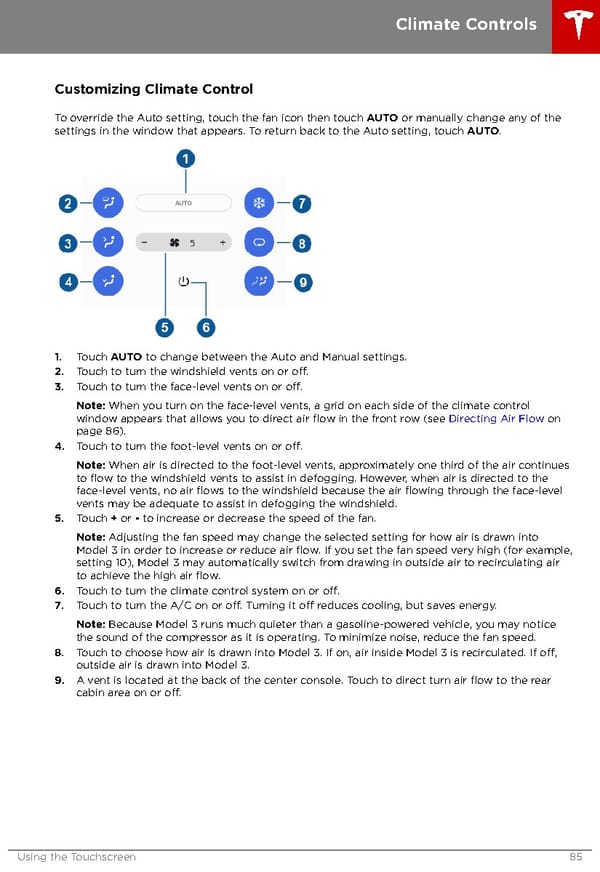
Climate Controls Customizing Climate Control To override the Auto setting, touch the fan icon then touch AUTO or manually change any of the settings in the window that appears. To return back to the Auto setting, touch AUTO. 1. Touch AUTO to change between the Auto and Manual settings. 2. Touch to turn the windshield vents on or off. 3. Touch to turn the face-level vents on or off. Note: When you turn on the face-level vents, a grid on each side of the climate control window appears that allows you to direct air flow in the front row (see Directing Air Flow on page 86). 4. Touch to turn the foot-level vents on or off. Note: When air is directed to the foot-level vents, approximately one third of the air continues to flow to the windshield vents to assist in defogging. However, when air is directed to the face-level vents, no air flows to the windshield because the air flowing through the face-level vents may be adequate to assist in defogging the windshield. 5. Touch + or - to increase or decrease the speed of the fan. Note: Adjusting the fan speed may change the selected setting for how air is drawn into Model 3 in order to increase or reduce air flow. If you set the fan speed very high (for example, setting 10), Model 3 may automatically switch from drawing in outside air to recirculating air to achieve the high air flow. 6. Touch to turn the climate control system on or off. 7. Touch to turn the A/C on or off. Turning it off reduces cooling, but saves energy. Note: Because Model 3 runs much quieter than a gasoline-powered vehicle, you may notice the sound of the compressor as it is operating. To minimize noise, reduce the fan speed. 8. Touch to choose how air is drawn into Model 3. If on, air inside Model 3 is recirculated. If off, outside air is drawn into Model 3. 9. A vent is located at the back of the center console. Touch to direct turn air flow to the rear cabin area on or off. Using the Touchscreen 85
 Tesla Model 3 | Owner's Manual Page 84 Page 86